ترك رسالة
إذا كنت مهتمًا بمنتجاتنا وترغب في معرفة المزيد من التفاصيل، يرجى ترك رسالة هنا، وسنرد عليك في أقرب وقت ممكن.

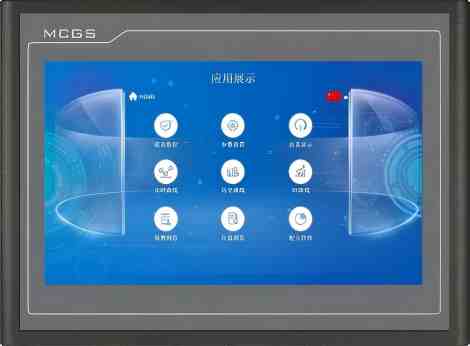
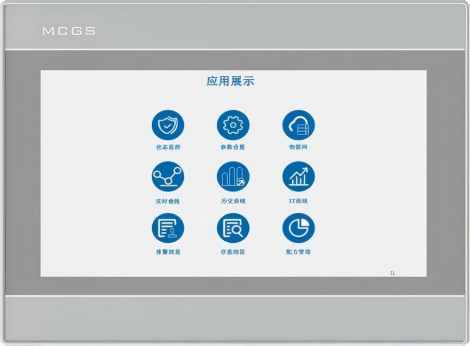
شاشة اللمس الذكية من سلسلة K هي شاشة متوسطة إلى عالية الجودة أطلقتها شركة كونلون تك، ويمكنها تلبية مجموعة متنوعة من احتياجات تطبيقات المستخدم.
رقم الصنف :
TPC1031Ktالطلب (الحد الأدنى للكمية) :
50قسط :
Paypal\TT\Western Unionمنشأ المنتج :
Guangdong, Chinaوزن :
1KGسلسلة K: تتميز بسهولة الاستخدام مع واجهات غنية بالميزات. جميع الطرازات بدقة 800×480 بكسل، بينما يتميز الطراز ذو الشاشة 10 بوصات بدقة 1024×600 بكسل. تتوفر خيارات ذاكرة الوصول العشوائي (RAM) بسعة 128 ميجابايت أو 256 ميجابايت، وسعات تخزين 512 ميجابايت و8 جيجابايت. مزودة بواجهات متعددة.
مقدمة المنتج
| تصنيف | غرض | TPC1031Kt |
| خصائص المنتج | شاشة LCD | شاشة TFT مقاس 10.1 بوصة |
| نوع الإضاءة الخلفية | قاد | |
| لون العرض | 262 ألف | |
| دقة | 1024 × 600 | |
| سطوع الشاشة | 300 شمعة/م² | |
| لمسات | نوع المقاومة ذو الأربعة أسلاك | |
| جهد الدخل | 24 ± 20% VDC | |
| القدرة المقدرة | 6W | |
| المعالج | معالج Cortex-A7 متعدد النواة بتردد 800 ميجاهرتز | |
| ذاكرة | 256 ميجابايت | |
| تخزين النظام | 512 ميجابايت | |
| مساحة تخزين | 512 ميجابايت | |
| ساعة يدوية | مدمج | |
| برنامج التكوين | McgsPro 3.3.6.6354 SP1.3 والإصدارات الأحدث | |
| واجهة خارجية | واجهة تسلسلية | الوضع 1: COM1 (232) COM2 (485) COM3 (485) COM4 (485) |
| واجهة USB | 1 × مضيف/تابع | |
| منفذ إيثرنت | 1 × 10/100 ميجاهرتز قابل للتكيف | |
| الظروف البيئية | درجات حرارة التشغيل | 0 درجة مئوية ~ 45 درجة مئوية |
| رطوبة التشغيل | 5%~90% (بدون تكثيف) | |
| درجة حرارة التخزين | -10 درجة مئوية ~ 60 درجة مئوية | |
| رطوبة التخزين | 5%~90% (بدون تكثيف) | |
| مواصفات المنتج | مادة الغلاف | البلاستيك الهندسي |
| لون الغلاف | الرماد الصناعي | |
| بُعد المظهر | 274 مم × 193 مم | |
| فتح الخزانة | 261 مم × 180 مم | |
| عرض الأبعاد | 223 مم × 126 مم | |
| شهادة | شهادة المنتج | يتوافق مع معايير شهادة CE/FCC |
| درجة الحماية | IP65 (اللوحة الأمامية) | |
| التوافق الكهرومغناطيسي | الدرجة الصناعية الثالثة |
*
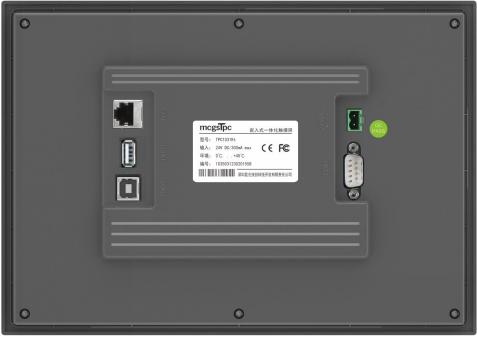
وصف الواجهة
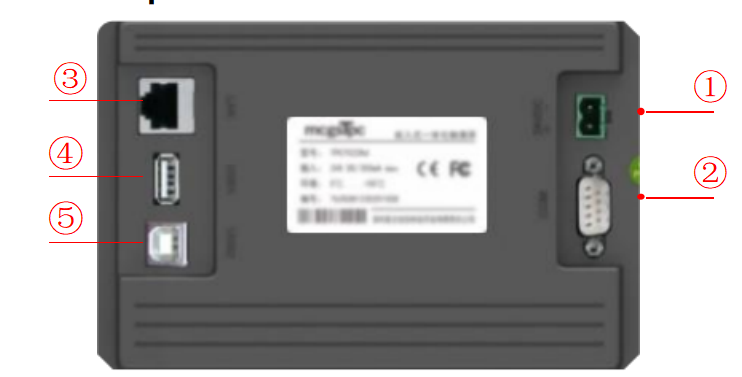
① | مزود الطاقة | | - | واحد | 0V |
+ | اثنين | تيار مستمر 24 فولت | |||
② |
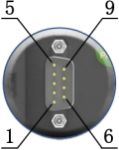
منفذ تسلسلي |
|
COM1 | اثنين | RS232 RXD |
ثلاثة | RS232 TXD | ||||
خمسة | أرضي | ||||
COM2 | سبعة | RS485+ | |||
ثمانية | RS485- | ||||
COM3 | أربعة | RS485+ | |||
تسعة | RS485- | ||||
COM4 | واحد | RS485+ | |||
ستة | RS485- | ||||
COM9 | سبعة | RXD+ | |||
ثمانية | RXD- | ||||
أربعة | TXD+ | ||||
تسعة | TXD- | ||||
ملاحظة: لا يمكن استخدام com9 و com2 و com3 في نفس الوقت | |||||
③ | منفذ الإنترنت | منفذ شبكة تكيفي بسرعة 10/100 ميجابت في الثانية، والذي يمكنه تحميل أو تنزيل المشاريع، وترقية بيئة التشغيل (يجب أن تكون بيئة تشغيل الشاشة Pro3.3.2 أو أحدث)، بالإضافة إلى التواصل مع الأجهزة الأخرى | |||
④ | منفذ USB1 الرئيسي | يدعم منفذ USB 2.0 تحديث بيئة تشغيل شاشة اللمس، والهندسة، والنظام، واستيراد وتصدير البيانات، ووظائف أخرى عبر قرص USB، وهو غير متوافق مع منفذ الجهاز التابع. | |||
⑤ | منفذ USB2 تابع | منفذ USB عام (من النوع B)، والذي يمكنه تحميل أو تنزيل المشاريع وهو حصري للمنفذ الرئيسي | |||
تركيب المنتج
أبعاد المنتج
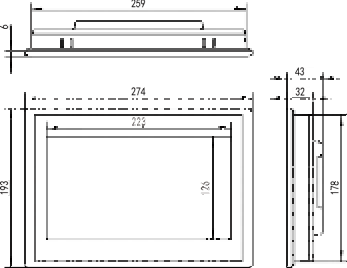
الأبعاد الخارجية
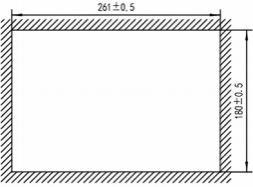
حجم الفتحة
طريقة التركيب

تركيب الخطافات
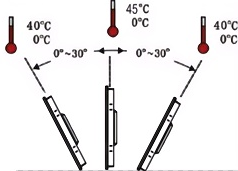
زاوية التركيب
صيانة المنتج
1.5.1 بطارية بديلة
موقع البطارية: TPC على لوحة الدائرة داخل المنتج
مواصفات البطارية: بطاريات ليثيوم CR2032 3 فولت
لإزالة البطارية: قم بإزالة المادة اللاصقة الموجودة أعلى البطارية، وحرك الطرف الموجب برفق إلى موضع البطارية، وستخرج البطارية تلقائيًا.
تركيب البطارية: أولاً، ضع البطارية في مشبك الطرف الموجب، ثم اضغط برفق على الطرف الآخر أسفل المشبك البلاستيكي. تأكد من إدخال كل من المشابك البلاستيكية ومشبك الطرف الموجب المعدني بشكل صحيح.
عند التركيب، يرجى توخي الحذر لتجنب حدوث ماس كهربائي بين طرفي البطارية الموجب والسالب.
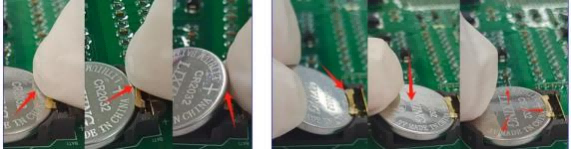
قم بإزالة البطارية ثم قم بتركيب البطارية
1.5.2 معايرة اللمس
ادخل إلى إعدادات النظام، ثم اضغط مطولاً على منطقة فارغة. ستبدأ عملية معايرة اللمس خلال ثوانٍ.
معايرة TPC: استخدم قلمًا أو إصبعًا للضغط برفق مع الاستمرار على مركز مؤشر التقاطع. عندما ينتقل المؤشر إلى النقطة التالية، ارفعه. كرر هذه العملية حتى تظهر رسالة "تم قياس إعدادات المعايرة الجديدة". انقر على زر "تأكيد المعايرة" لحفظ الإعدادات والخروج من برنامج المعايرة.
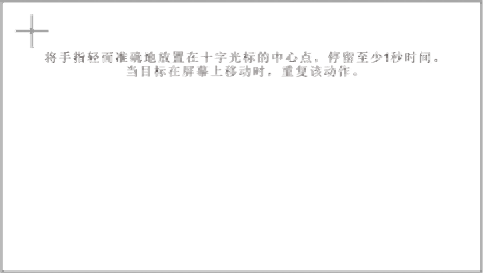
ضع إصبعك برفق ودقة على مركز مؤشر التصويب، واستمر بالضغط عليه لمدة ثانية واحدة على الأقل بينما يتحرك الهدف عبر الشاشة. كرر هذه العملية.
1.5.3 فيلم ثلاثي الحماية
يمكن لطبقة واقية أن تمنع بشكل فعال الغبار والزيوت والملوثات الأخرى المتولدة أثناء الإنتاج من التأثير على الجلد. مادة TPC عرضة للتآكل، لذلك، عند الضرورة، يمكن استخدام غشاء واقٍ لحمايتها. سنستخدم هذا كمثال توضيحي؛ وسيتم مناقشة النماذج الأخرى لاحقًا. خطوات تطبيق واقي الشاشة متشابهة.
الأدوات المطلوبة: تتضمن TPC غشاءً ثلاثي الحماية (متوفر للشراء من موردي الشاشات)، وقطعة قماش مقاومة للغبار، ومنظف مضاد للكهرباء الساكنة صديق للبيئة، وبكرة.
خطوات التشغيل:
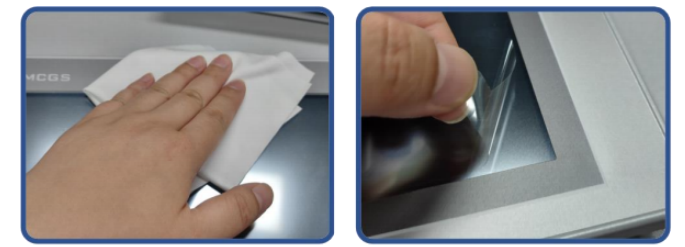
١) نظّف الشاشة. استخدم قطعة قماش ناعمة لإزالة الأوساخ من اللوحة الأمامية لمنع ظهور الفقاعات عند تركيب واقي الشاشة. إذا كان سطح TPC متسخًا بشدة، استخدم منظفًا لإزالة الملوثات من الشقوق حول الحواف.
2) قم بإزالة الغشاء الواقي المصنوع من مادة البولي إيثيلين تيريفثالات (PET) المثبت في المصنع ونظف أي بقايا لمنع تكون الفقاعات أثناء الاستخدام.
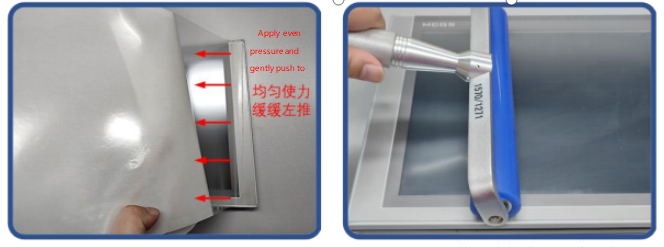
3) انزع زاوية من الغشاء الخلفي على الجانب الأيمن. قم بمحاذاة الجانب الأيمن من الغشاء مع الجانب الأيمن من شاشة TPC. بيدك اليسرى، انزع الغشاء الخلفي ببطء، وبيدك اليمنى، اضغط بالتساوي لدفع الغشاء برفق على الشاشة من اليمين إلى اليسار.
4) بعد وضع الفيلم، استخدم أسطوانة للضغط على الطبقة اللاصقة الخلفية بقوة لمنع تكون فقاعات الهواء.
الاحتياطات:
1) يجب إزالة الغشاء الواقي المُثبّت في المصنع قبل وضع الغشاء الواقي ثلاثي الطبقات. غشاء واقي من مادة البولي إيثيلين تيريفثالات (PET).
2) يُعدّ الغشاء المقاوم للعوامل الجوية مادة استهلاكية. إذا تبيّن أن حوافه متقشرة أو منتفخة، فيجب وضع غشاء جديد.
3) عند استبدال الغشاء الواقي، قم برفعه من الزاوية اليمنى السفلية للوحة الأمامية، مع الحرص على عدم خدش غشاء الإغلاق.
2 تحميل المشروع
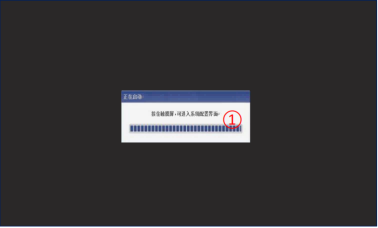
الخطوة 1: استخدم مصدر طاقة تيار مستمر 24 فولت TPC. بعد تشغيل الجهاز وبدء التشغيل، سيظهر شريط تقدم "بدء التشغيل" على الشاشة. عند هذه النقطة، انقر على TPC①، وسيتم نقلك إلى واجهة تهيئة بدء التشغيل. في حال عدم اتخاذ أي إجراء، سيتم نقلك تلقائيًا إلى واجهة تشغيل المشروع.
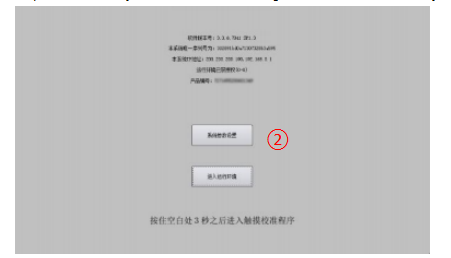
الخطوة 2: انقر فوق زر إعدادات معلمات النظام ②. ادخل إلى واجهة إعدادات نظام TPC.
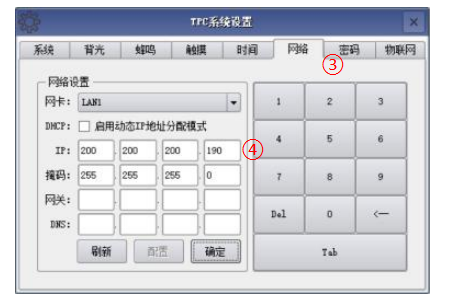
الخطوة 3: حدد علامة تبويب إعدادات الشبكة ③، وقم بتكوين ... عنوان IP الخاص بـ TPC 4، عنوان IP الافتراضي لـ TPC هو 200.200.200.190.
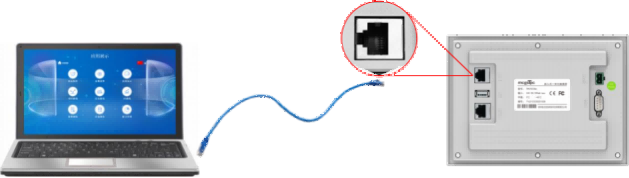
الخطوة 4: قم بتوصيل الكمبيوتر و... TPC، وعنوان IP الخاص بالكمبيوتر. مع عنوان IP الخاص بمنفذ LAN الخاص بـ TPC المتصل، قم بتعيينهما على نفس شريحة الشبكة.
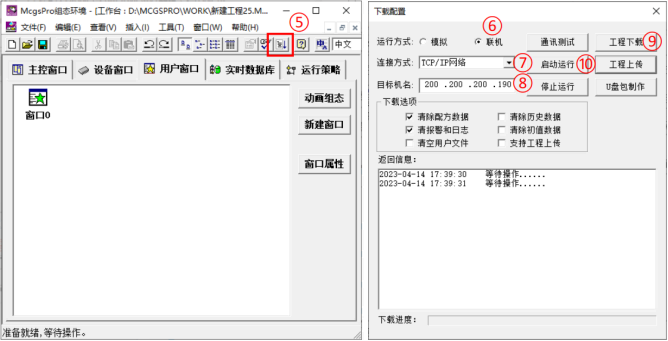
الخطوة 5: استخدم برنامج MCGS Pro. افتح مشروع TPC، انقر لتنزيل المشروع (⑤). افتح صفحة خصائص تكوين التنزيل وحدد "متصل" كوضع التشغيل. حدد طريقة الاتصال "TCP/IP" أو "شبكة" (⑦). أدخل اسم الجهاز المستهدف TPC أو عنوان IP الخاص به (⑧). انقر على "تنزيل المشروع" (⑨). بعد اكتمال التنزيل بنجاح، انقر على "بدء التشغيل" (⑩) أو... اضغط على زر "دخول بيئة التشغيل" في واجهة TPC لتشغيل المشروع على الشاشة.

ترك رسالة
امسح ضوئيًا إلى WeChat :

امسح ضوئيًا إلى واتساب :