ترك رسالة
إذا كنت مهتمًا بمنتجاتنا وترغب في معرفة المزيد من التفاصيل، يرجى ترك رسالة هنا، وسنرد عليك في أقرب وقت ممكن.

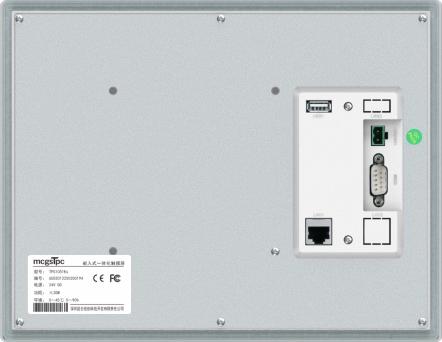
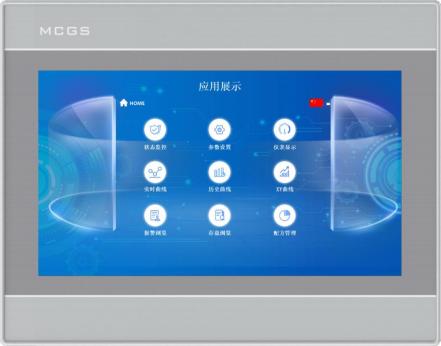
واجهة المستخدم الرسومية (HMI) من سلسلة B المزودة بتقنية Wi-Fi 4G، طراز TPC7031Bin
تتصل شاشات إنترنت الأشياء من سلسلة B بالشبكة عبر 4G/Wi-Fi، مما يتيح التشغيل والصيانة عن بعد للشاشات نفسها والأجهزة المتصلة بها.
رقم الصنف :
TPC7031Binالطلب (الحد الأدنى للكمية) :
50قسط :
Paypal\TT\Western Unionمنشأ المنتج :
Guangdong, Chinaوزن :
1KGتوفر شاشات إنترنت الأشياء من سلسلة B اتصالاً شبكياً عبر دعم ثنائي القنوات لكل من شبكة الجيل الرابع الخلوية وشبكة الواي فاي اللاسلكية، مما يُسهّل عمليات التشغيل والصيانة عن بُعد الشاملة، ليس فقط للشاشات نفسها، بل أيضاً لمختلف الأجهزة الطرفية المتصلة بها. يضمن حل الاتصال المتكامل هذا مراقبة وإدارة وتحكماً سلساً من موقع مركزي بعيد، مما يُعزز موثوقية النظام وكفاءته التشغيلية.
مواصفات المنتج
تصنيف | غرض | TPC |
ميزات المنتج
| شاشة LCD | شاشة TFT مقاس 7 بوصات |
نوع الإضاءة الخلفية | قاد | |
لون العرض | 262 ألف | |
دقة | 1024×600 | |
سطوع الشاشة | 350 شمعة/م² | |
شاشة لمس | مقاوم رباعي الأسلاك | |
جهد الدخل | 24±20% فولت تيار مستمر | |
عزل الطاقة | مدمج | |
القدرة المقدرة | 9W | |
المعالج | معالج ثنائي النواة Cortex-A7 | |
ذاكرة | 128 ميجابايت | |
تخزين النظام | 128 ميجابايت | |
مساحة تخزين | 128 ميجابايت | |
برنامج التكوين | McgsPro 3.3.6.6354 SP1.3 والإصدارات الأحدث | |
الواجهات الخارجية
| واجهات التسلسل | الوضع 1: COM1(232) COM2(485) COM3(485) |
واجهات التسلسل | الوضع 2: COM1(232) COM9(422) | |
عزل المنفذ التسلسلي | مدمج | |
واجهات USB | مضيف واحد × واحد | |
منافذ إيثرنت | التفاوض التلقائي 1×10/100 ميجا | |
توسيع نطاق الشبكة اللاسلكية
| واجهات واي فاي | واي فاي IEEE802.11 b/g/n |
واجهات الجيل الرابع | تشاينا موبايل / تشاينا يونيكوم / تشاينا تيليكوم | |
الظروف البيئية
| درجة حرارة التشغيل | 0 درجة مئوية ~ 45 درجة مئوية |
رطوبة التشغيل | 5%~90% (بدون تكثيف) | |
درجة حرارة التخزين | -10 درجة مئوية ~ 60 درجة مئوية | |
رطوبة التخزين | 5%~90% (بدون تكثيف) | |
مواصفات المنتج
| مواد البناء | البلاستيك الهندسي |
لون الهيكل | أبيض فضي | |
الأبعاد الكلية | 203 مم × 149 مم | |
فتحة خزانة | 192 مم × 138 مم | |
الشهادات
| شهادات المنتج | يتوافق مع معايير شهادة CE/FCC |
فئة الحماية | IP65 (اللوحة الأمامية) | |
التوافق الكهرومغناطيسي (EMC) | المستوى الصناعي 3 |
*ملاحظة: يدعم التوسع اللاسلكي إما شبكة Wi-Fi أو شبكة 4G فقط (خياران في جهاز واحد).
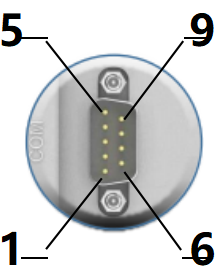
وصف الواجهة
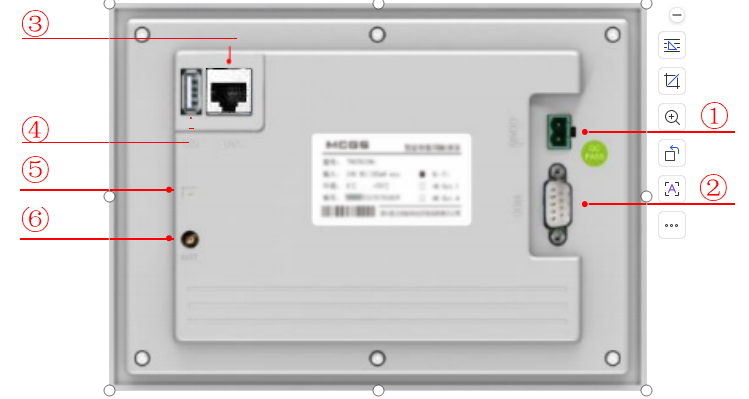
① | مصدر الكهرباء |
|
| - | 1 | 0V |
+ | 2 | تيار مستمر 24 فولت | ||||
② |
منفذ تسلسلي |
|
COM1 | 2 | RS232 RXD | |
3 | RS232 TXD | |||||
5 | أرضي | |||||
COM2 | 7 | RS485+ | ||||
8 | RS485- | |||||
COM3 | 4 | RS485+ | ||||
9 | RS485- | |||||
COM9 | 7 | RXD+ | ||||
8 | RXD- | |||||
4 | TXD+ | |||||
9 | TXD- | |||||
ملاحظة: لا يمكن استخدام COM9 في نفس الوقت مع COM2 أو COM3. | ||||||
③ | فتحة الهوائي | قم بربط البرغي باتجاه عقارب الساعة | قم بفك البرغي عكس اتجاه عقارب الساعة. | |||
|  |  | ||||
④ | فتحة بطاقة SIM (للشاشات التي تدعم تقنية 4G فقط) | أدخل بطاقة SIM بحيث يكون الجزء الخلفي من واجهة المستخدم الرسومية متجهًا للأعلى. |  | اضغط للإخراج. |  | |
⑤ | منفذ إيثرنت | منفذ إيثرنت للتفاوض التلقائي بسرعة 10 ميجا/100 ميجا: يدعم تحميل/تنزيل المشاريع، وترقيات بيئة التشغيل (يجب أن تكون بيئة تشغيل الشاشة Pro3.3.2 أو أعلى)، والاتصال بالأجهزة الأخرى. | ||||
⑥ | منفذ USB المضيف | USB 2.0: يدعم تحديثات بيئة تشغيل الشاشة اللمسية والمشاريع والنظام عبر محرك أقراص فلاش USB، بالإضافة إلى وظائف مثل استيراد وتصدير البيانات. | ||||
تركيب المنتج
أبعاد المنتج
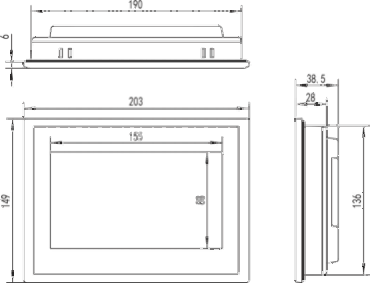
الأبعاد الخارجية
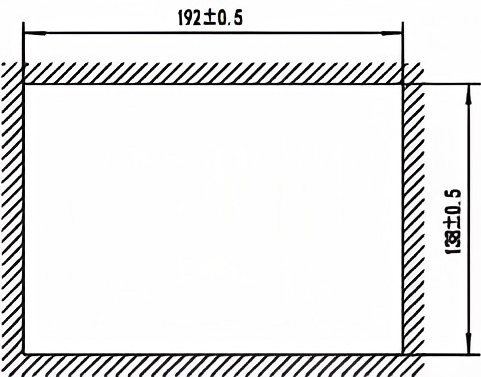
حجم الفتحة
طريقة التركيب
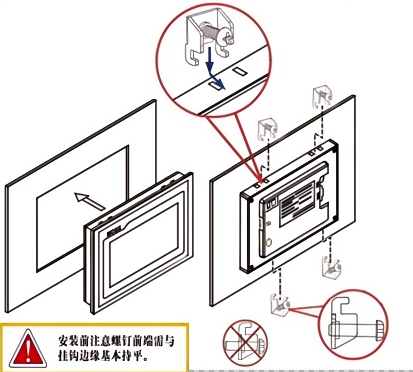
تركيب الخطافات
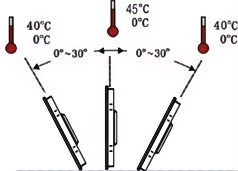
زاوية التركيب
1.5 صيانة المنتج
1.5.1 بطارية بديلة
موقع البطارية: على لوحة الدائرة داخل منتج TPC.
مواصفات البطارية: بطارية ليثيوم CR1220 3V (تم الاحتفاظ بالطراز والجهد كمعرفات قياسية).
إزالة البطارية: قم بإزالة مادة التثبيت اللاصقة الموجودة فوق البطارية، واسحب مشبك الطرف الموجب برفق، وستخرج البطارية تلقائيًا.
تركيب البطارية: ضع البطارية أولاً في مشبك الطرف الموجب، ثم اضغط برفق على الطرف الآخر أسفل المشابك البلاستيكية. تأكد من تثبيت كل من المشابك البلاستيكية ومشبك الطرف الموجب المعدني بشكل صحيح.
ملاحظات التثبيت:
1. تجنب حدوث ماس كهربائي بين طرفي البطارية الموجب والسالب أثناء التركيب.
2. بالنسبة لشاشات إنترنت الأشياء من الجيل الرابع، قم بإزالة لوحة التوسعة أولاً وتأكد من محاذاة ثقوب لوحة التوسعة عند إعادة التثبيت.
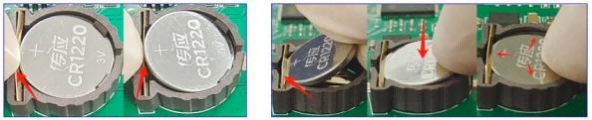
قم بإزالة البطارية ثم قم بتركيب البطارية
1.5.2 معايرة اللمس
قم بالوصول إلى واجهة إعدادات نظام TPC، واضغط مع الاستمرار على منطقة فارغة لمدة 3 ثوانٍ لتشغيل برنامج معايرة اللمس.
عملية معايرة TPC: استخدم قلمًا أو إصبعًا للنقر مع الاستمرار على النقطة المركزية لمؤشر التصويب. حرر الإصبع فقط عندما ينتقل المؤشر إلى النقطة التالية.
كرر هذا الإجراء حتى تظهر لك رسالة "تم تحديد إعدادات المعايرة الجديدة".
انقر على زر "تأكيد المعايرة" لحفظ الإعدادات والخروج من برنامج المعايرة.

ضع إصبعك برفق ودقة على مركز مؤشر التصويب، واستمر بالضغط عليه لمدة ثانية واحدة على الأقل بينما يتحرك الهدف عبر الشاشة. كرر هذه العملية.
1.5.3 تطبيق غشاء الحماية الثلاثية
يُمكن لتطبيق طبقة حماية ثلاثية على لوحة TPC أن يمنع بفعالية التلوث والتآكل الناتجين عن الغبار وبقع الزيت وغيرها من المواد المتولدة أثناء الإنتاج. لذا، يُمكن حماية لوحة TPC بطبقة حماية ثلاثية عند الحاجة. يتناول هذا القسم نموذج 1271Gn كمثال؛ وتتشابه خطوات تطبيق الطبقة على نماذج TPC الأخرى.
أدوات التحضير: غشاء حماية ثلاثي متوافق مع TPC (متوفر من خلال قناة شراء TPC)، قطعة قماش خالية من الغبار، منظف مضاد للكهرباء الساكنة وصديق للبيئة، وبكرة.
خطوات التشغيل:
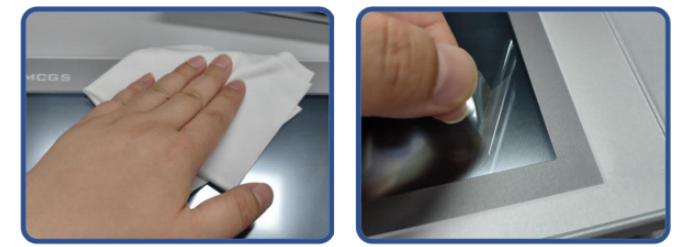
١) نظّف الشاشة. استخدم قطعة قماش ناعمة لإزالة الأوساخ من اللوحة الأمامية لمنع ظهور الفقاعات عند تركيب واقي الشاشة. إذا كان سطح TPC متسخًا بشدة، استخدم منظفًا لإزالة الملوثات من الشقوق حول الحواف.
2) قم بإزالة الغشاء الواقي المصنوع من مادة البولي إيثيلين تيريفثالات (PET) المثبت في المصنع ونظف أي بقايا لمنع تكون الفقاعات أثناء الاستخدام.
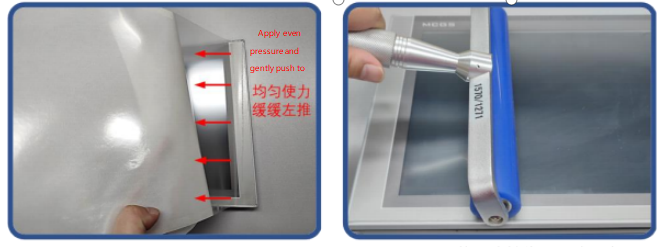
3) انزع زاوية من الغشاء الخلفي على الجانب الأيمن. قم بمحاذاة الجانب الأيمن من الغشاء مع الجانب الأيمن من شاشة TPC. بيدك اليسرى، انزع الغشاء الخلفي ببطء، وبيدك اليمنى، اضغط بالتساوي لدفع الغشاء برفق على الشاشة من اليمين إلى اليسار.
4) بعد وضع الفيلم، استخدم أسطوانة للضغط على الطبقة اللاصقة الخلفية بقوة لمنع تكون فقاعات الهواء.
الاحتياطات:
1) قبل وضع طبقة الحماية الثلاثية، يجب إزالة طبقة الحماية المصنوعة من مادة PET المثبتة في المصنع.
٢) يُعد غشاء الحماية الثلاثي مادة استهلاكية. في حال اكتشاف أي تقشر أو فقاعات في الحواف، يجب استبداله بغشاء جديد.
3) عند استبدال غشاء الحماية الثلاثي، انزعه من الزاوية السفلية اليمنى للوحة الأمامية.
احرص على عدم خدش الغشاء المغلق.
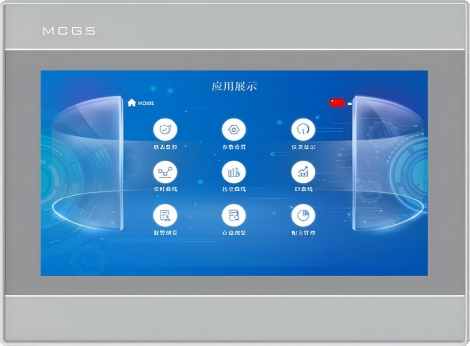
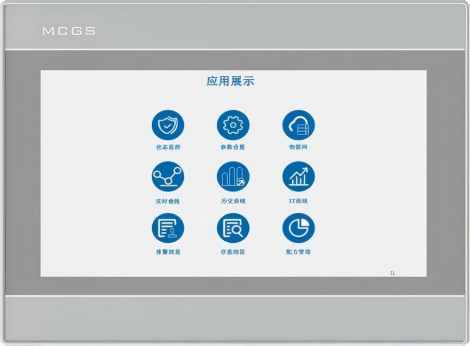
2 تحميل المشروع
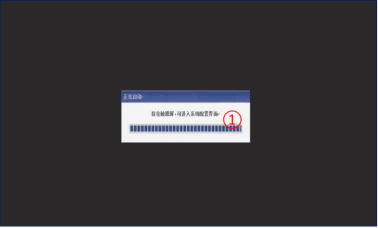
الخطوة 1: قم بتشغيل جهاز TPC باستخدام مصدر طاقة تيار مستمر 24 فولت. بعد بدء التشغيل، سيظهر شريط تقدم "بدء التشغيل" على الشاشة. عند هذه النقطة، انقر على شاشة TPC ① للدخول إلى واجهة تهيئة بدء التشغيل؛ إذا لم يتم إجراء أي عملية، فسيتم الدخول تلقائيًا إلى واجهة وقت تشغيل المشروع.
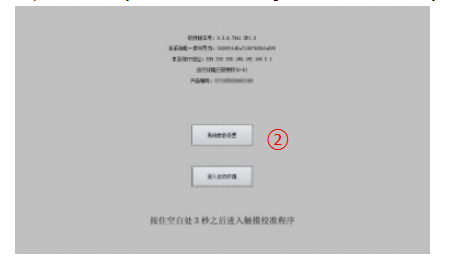
الخطوة 2: انقر فوق زر إعدادات معلمات النظام ②. ادخل إلى واجهة إعدادات نظام TPC.
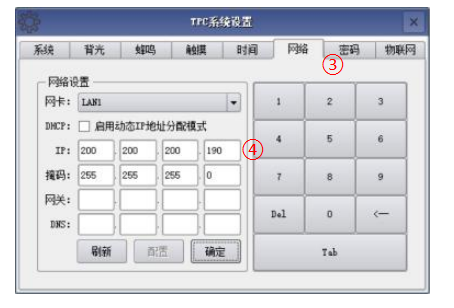
الخطوة 3: حدد علامة تبويب إعدادات الشبكة ③، وقم بتكوين ... عنوان IP الخاص بـ TPC 4، عنوان IP الافتراضي لـ TPC هو 200.200.200.190.
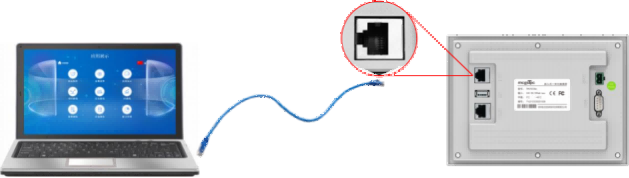
الخطوة 4: قم بتوصيل الكمبيوتر بجهاز TPC باستخدام كابل الشبكة، وقم بتعيين عنوان IP الخاص بالكمبيوتر إلى نفس الشبكة الفرعية الخاصة بعنوان IP لمنفذ LAN الخاص بجهاز TPC.
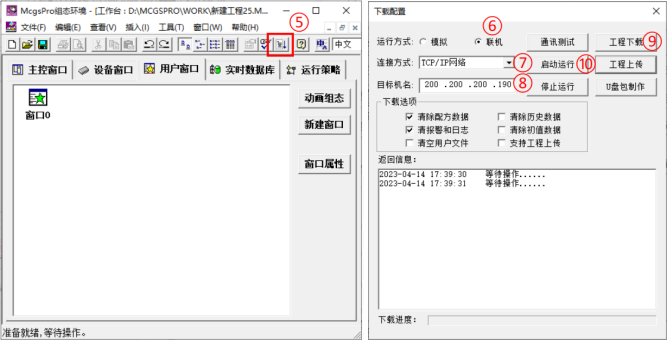
الخطوة 5: استخدم برنامج MCGS Pro. افتح مشروع TPC، انقر لتنزيل المشروع (⑤). افتح صفحة خصائص تكوين التنزيل وحدد "متصل" كوضع التشغيل. حدد طريقة الاتصال "TCP/IP" أو "شبكة" (⑦). أدخل اسم الجهاز المستهدف TPC أو عنوان IP الخاص به (⑧). انقر على "تنزيل المشروع" (⑨). بعد اكتمال التنزيل بنجاح، انقر على "بدء التشغيل" (⑩) أو... اضغط على زر "دخول بيئة التشغيل" في واجهة TPC لتشغيل المشروع على الشاشة.

ترك رسالة
امسح ضوئيًا إلى WeChat :

امسح ضوئيًا إلى واتساب :